
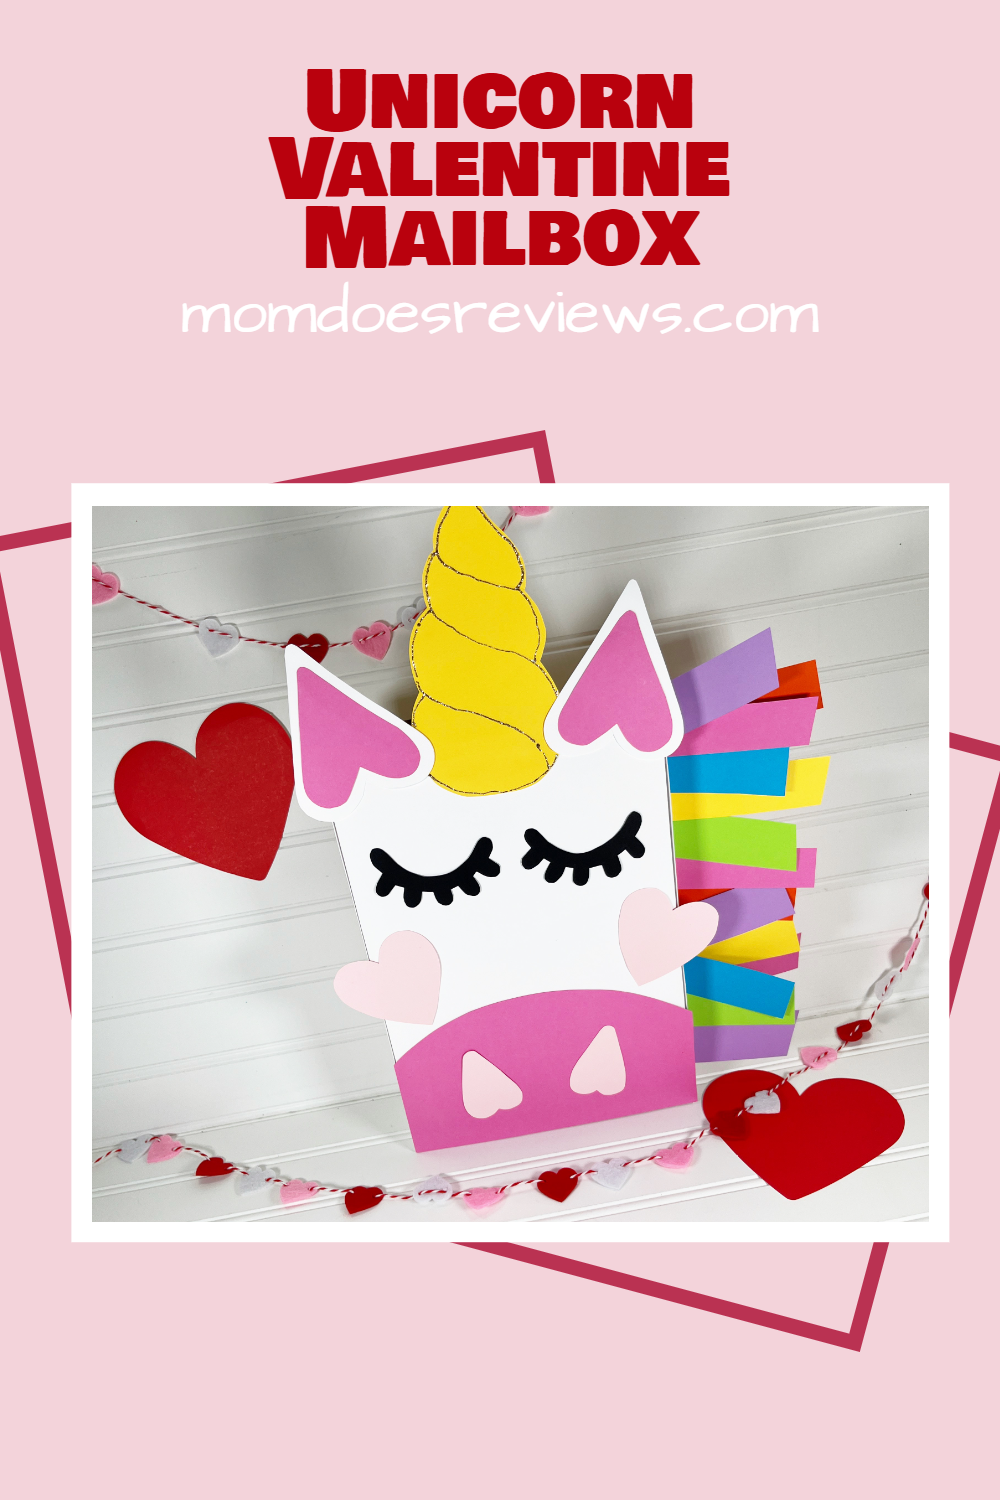
Magical Unicorn Valentine Mailbox (30-Minute Craft!)
Valentine’s Day is such a fun time for kids—cards, candy, and sweet messages from friends make the day feel extra special. With all those Valentine cards coming home, kids need a safe (and fun!) place to keep them. That’s where this Unicorn Valentine Mailbox Craft comes in! It’s bright, magical, and the perfect way to combine creativity with Valentine’s Day excitement.

Using simple supplies from your craft stash and a recycled cereal box, you can create this easy Unicorn Valentine Mailbox in about 30 minutes. It’s a budget-friendly craft that doesn’t require fancy materials, making it perfect for busy parents, classrooms, or last-minute Valentine projects. Kids will love decorating their own mailbox with colorful details, glitter, and unicorn flair.
Beyond being adorable, this craft also supports learning and development. As kids cut, glue, and decorate, they’re practicing fine motor skills, following directions, and expressing creativity. It’s also a great opportunity to spark conversations about unicorns, imagination, and kindness—making this Unicorn Valentine Mailbox more than just a craft, but a fun and meaningful holiday activity kids will treasure.
More Valentine’s Day Crafts:
If so, be sure and check out this SUPER Cute and ‘Sweet’ Teddy Bear Pop Up Card Craft! It is an adorable craft that doesn’t require a lot of materials and is easy to make by following the step-by-step instructions included.
For Valentine’s Day, create quick and easy Fortune Cookies from Felt for friends and classmates – full of funny fortunes and chocolate kisses! This craft is perfect to do with your kids and it’s certainly one that will delight everyone!

Looking for a fun and cute Valentine’s Day project that doesn’t involve candy? If so, you just have to take a look at this super cute and fun Valentine’s Day Felt Heart People Pockets Craft! The kids will squeal in delight and be totally delighted to create these fun cards!
Don’t miss this cute Unicorn Craft: Get ready to gallop into a world of pure enchantment and creativity with a craft that’s truly magical! Our delightful Dollar Store Unicorn Paper Plate Craft is here to prove that a simple paper plate can be transformed into the most adorable and majestic unicorn.

Materials:

- Cereal Box, 12 oz. size – Recycled
- Gold Glitter Glue – Dollar Store
- Colored Cardstock – Black, White, Light Pink, Medium Pink, Orange, Yellow, Bright Green, Blue, Lavender
- Glue Gun and Glue Sticks – Dollar Store
- Scissors
- Pencil
- Ruler
- PATTERNS
Instructions:
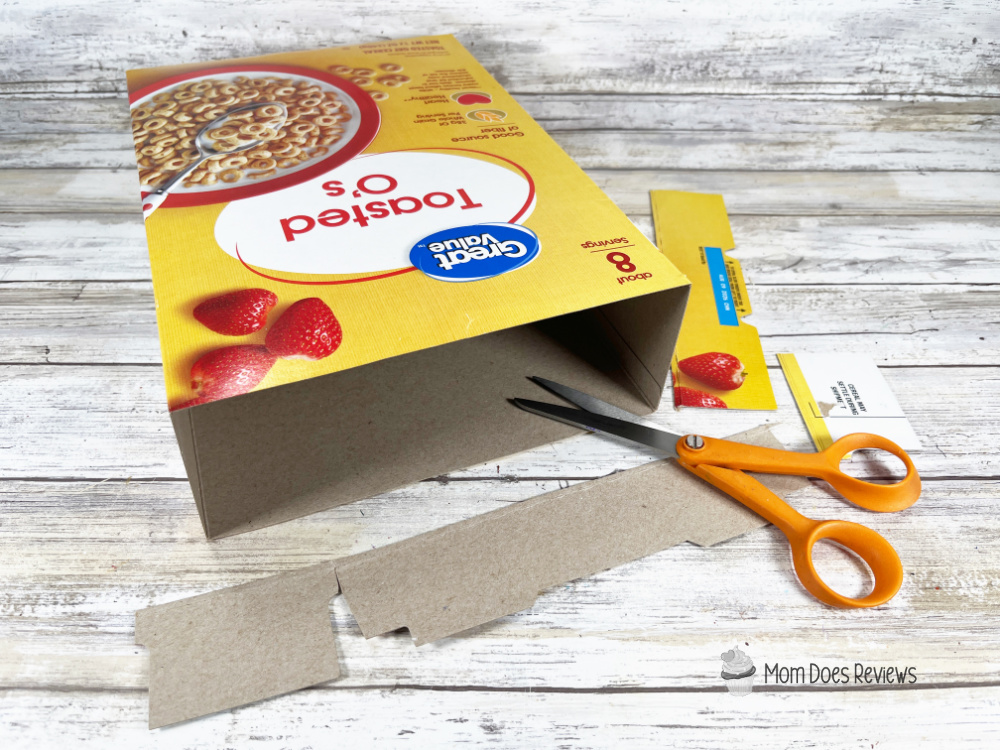
- Gather all supplies. Using scissors, remove the flaps from the four sides of the cardboard cereal box.

- The height of the 12 oz. box matches up perfectly with 8.5” by 11” cardstock. Measure and cut two rectangles 2.75” wide by 11” tall from a piece of white cardstock, then cut out with scissors. Fit a second piece of white cardstock across the front of the box and carefully fold the right side and left side, then firmly crease the cardstock. TIP: You can also use felt, craft foam, or construction paper to complete this project.
- Attach the folded piece of white cardstock to the front of the box with a glue gun and glue sticks, then secure the folded sections to the sides of the box. Glue the two rectangles of white cardstock to the right and left sides of the box. TIP: You can use liquid craft glue for this project, but you will have to wait for it to dry.
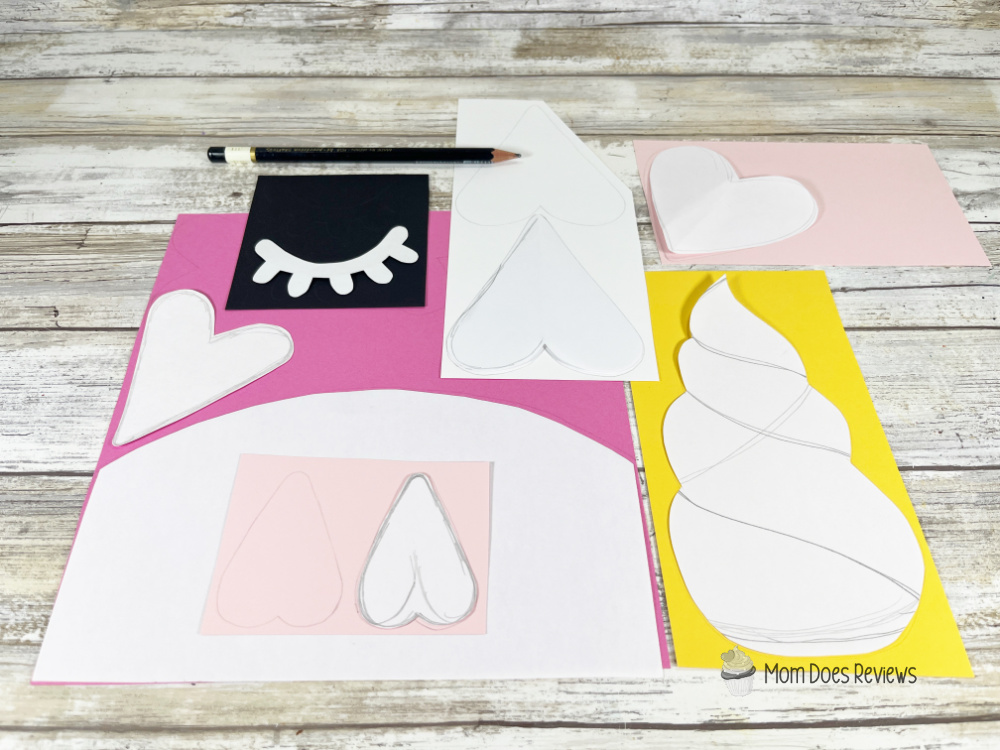
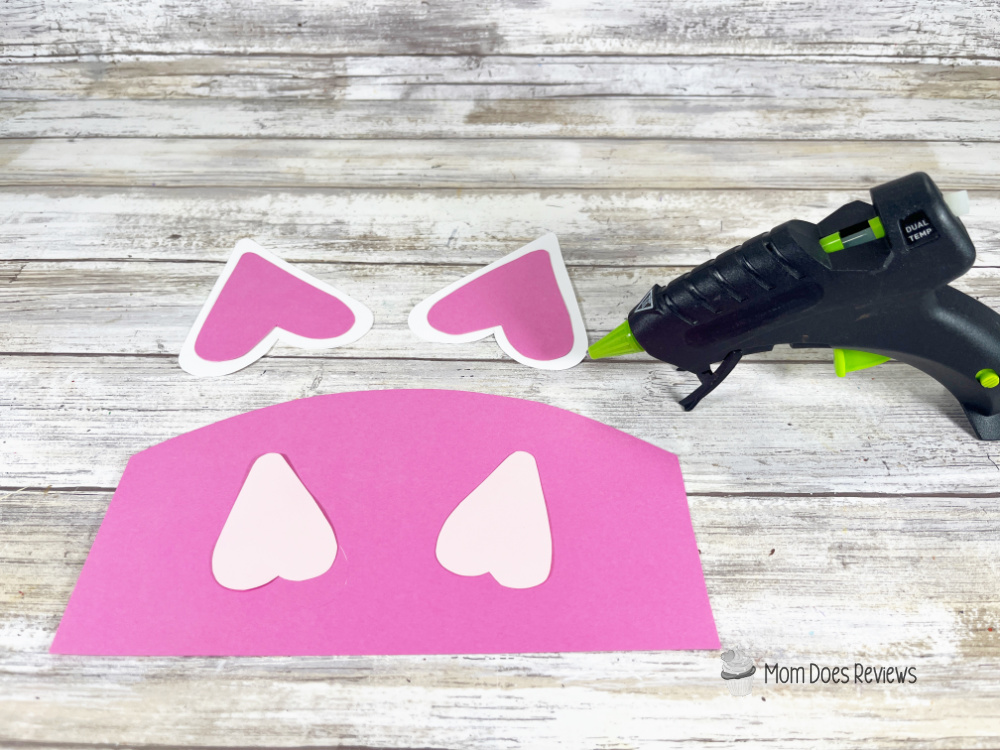
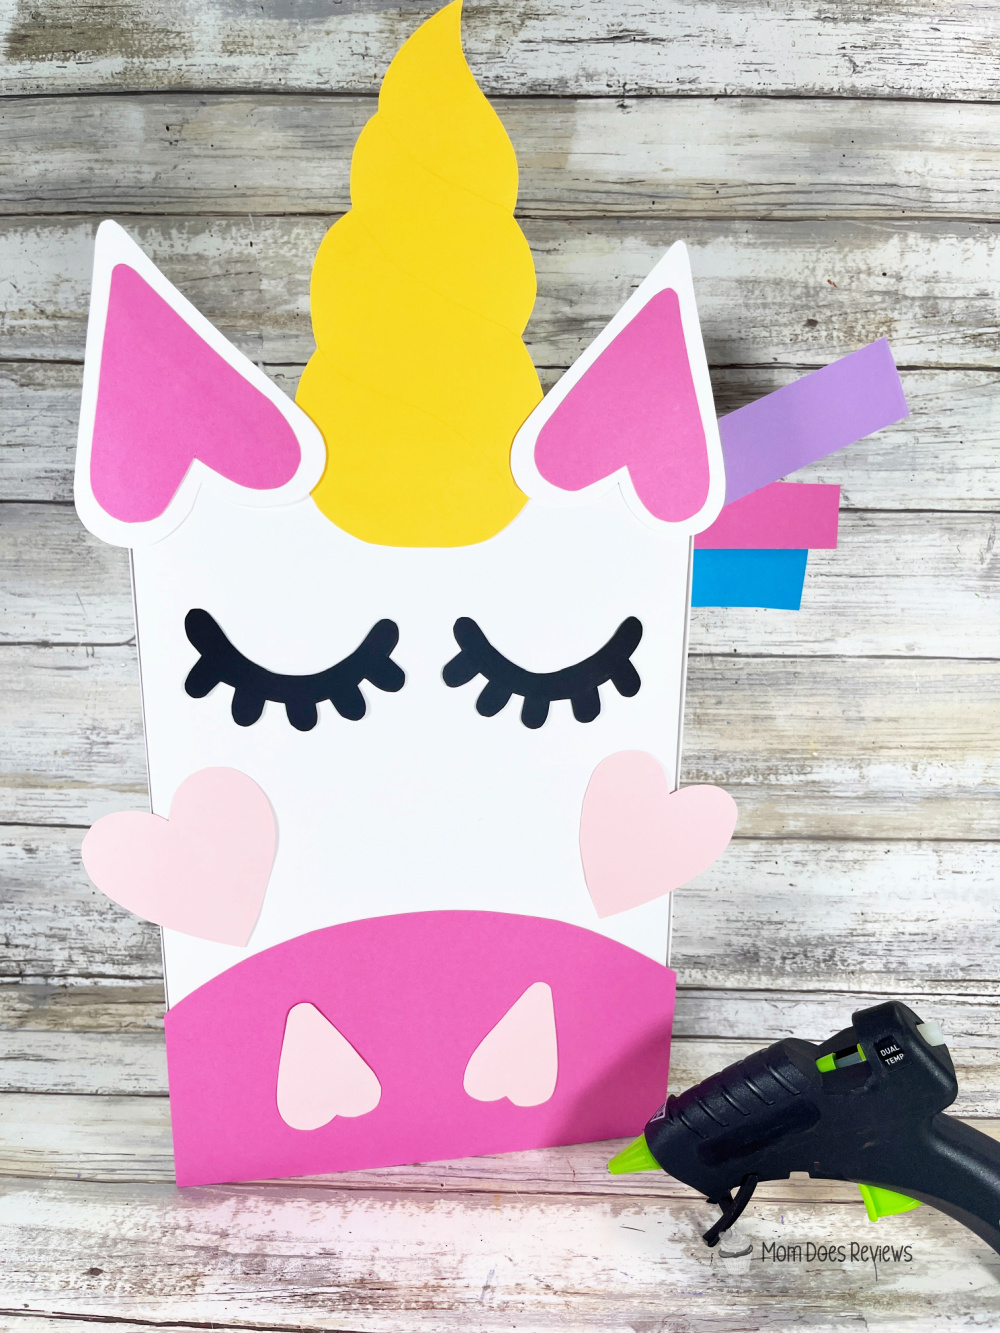
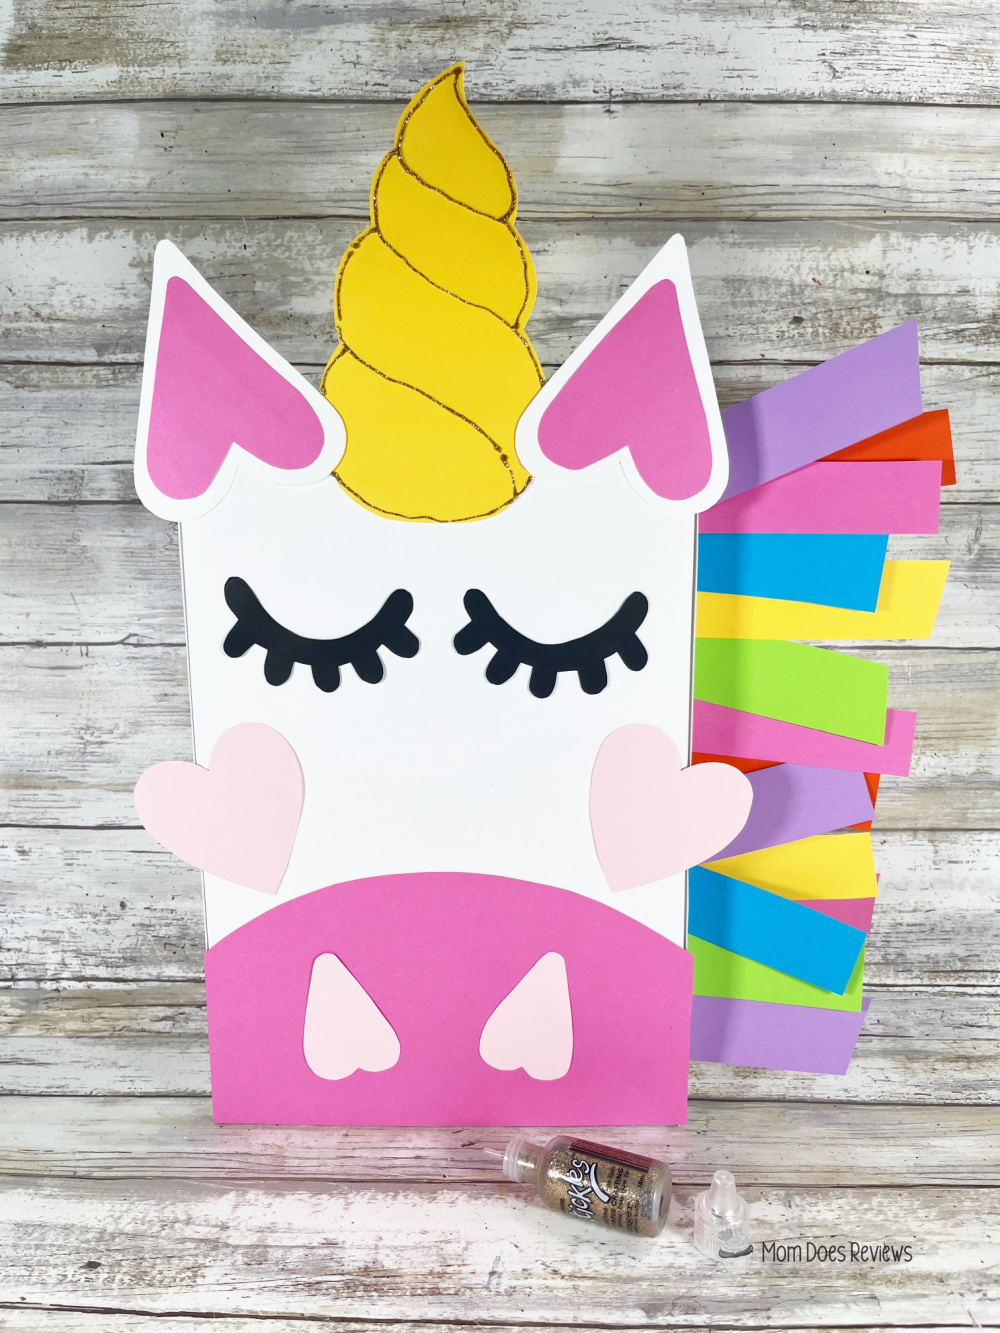
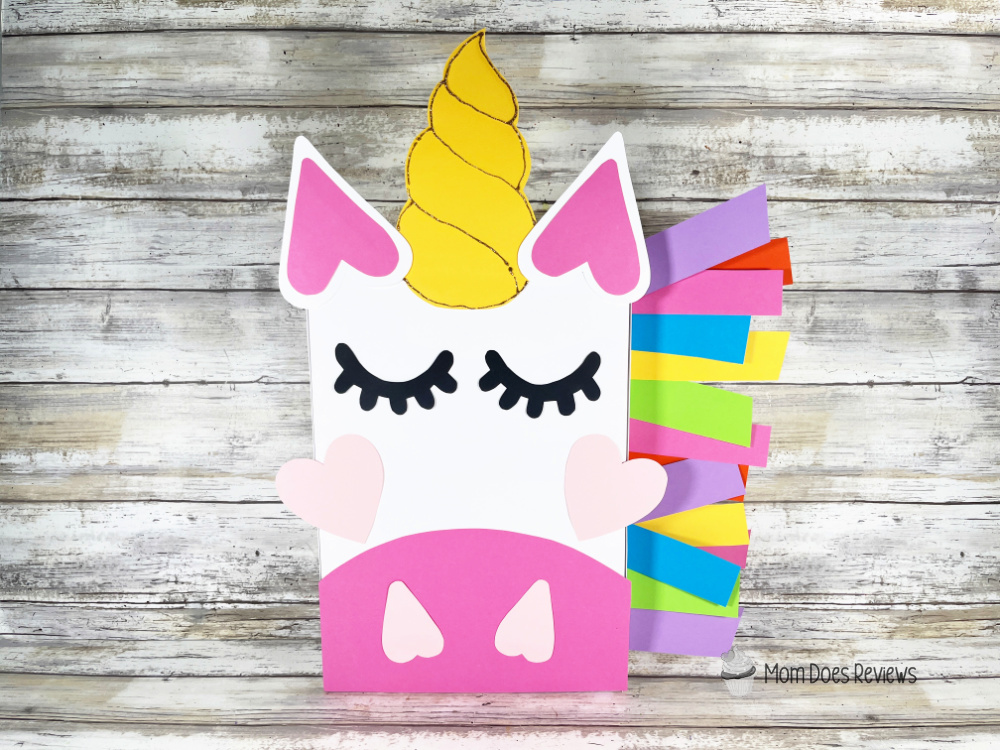
- Download, print, and cut out the unicorn patterns. Trace the muzzle once and inner ears twice onto medium pink cardstock, the horn once onto yellow cardstock, the outer ears twice onto white cardstock, the closed eyes twice onto black cardstock, and the cheeks twice and the nostrils twice onto light pink cardstock with a pencil.
- Cut out all the traced patterns with scissors, cutting inside the lines to create a clean finished project.
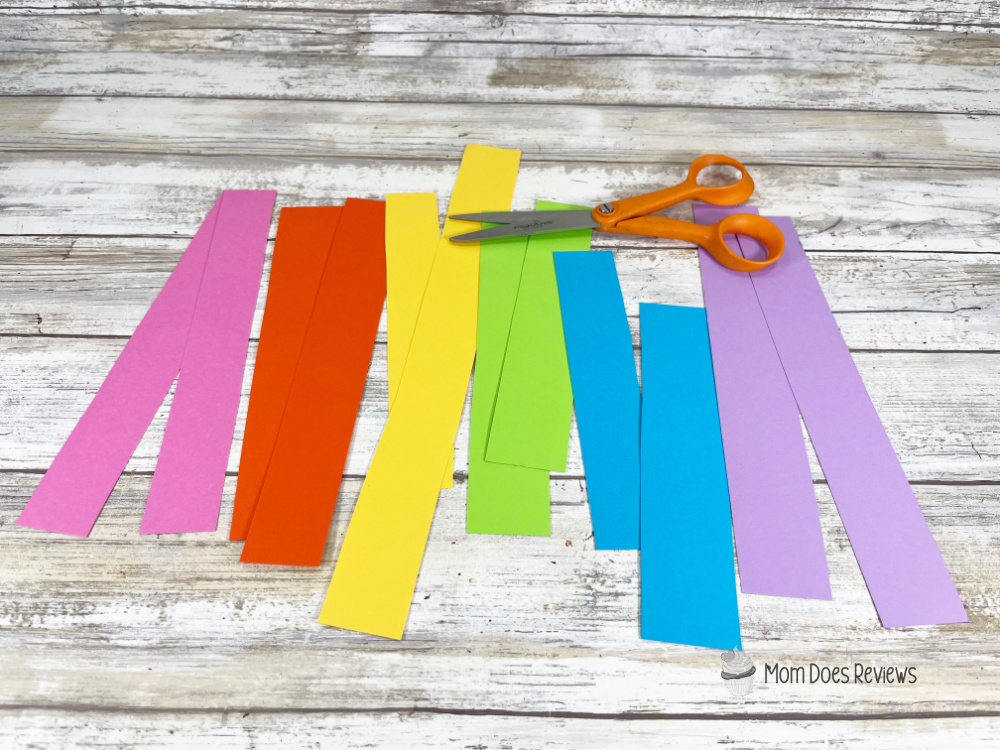
- Using scissors, cut two rectangles approximately 1” wide by 5”-6” long from medium pink, orange, yellow, bright green, blue, and lavender cardstock for the unicorn mane.
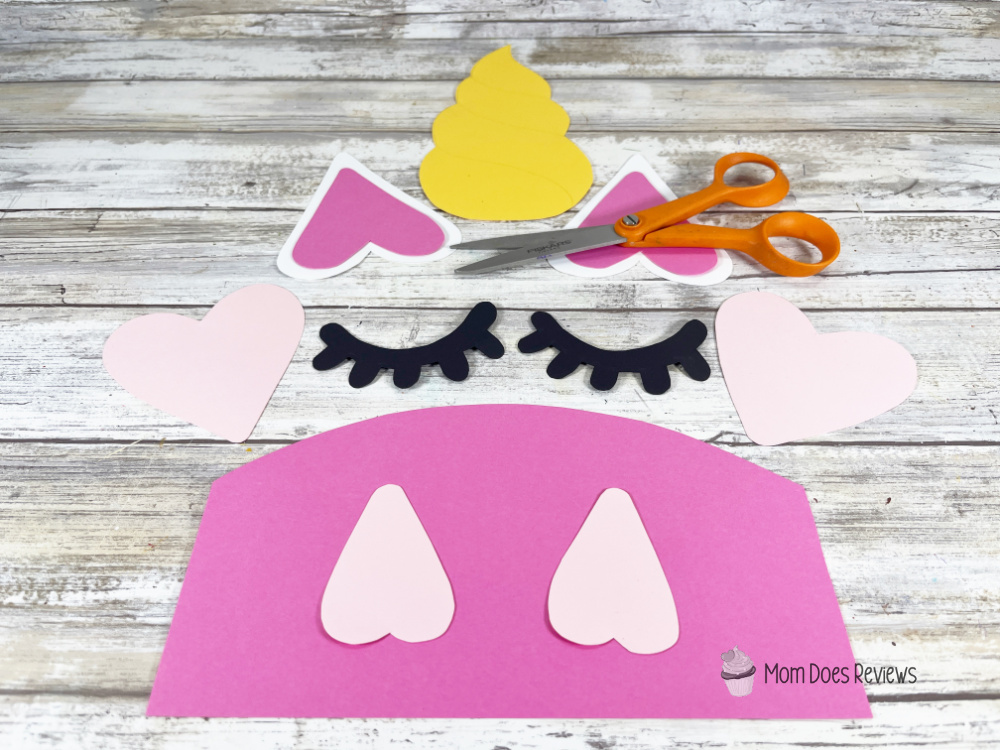
- Attach the inner ears to the outer ears, and the nostrils to the muzzle with a glue gun and glue sticks.
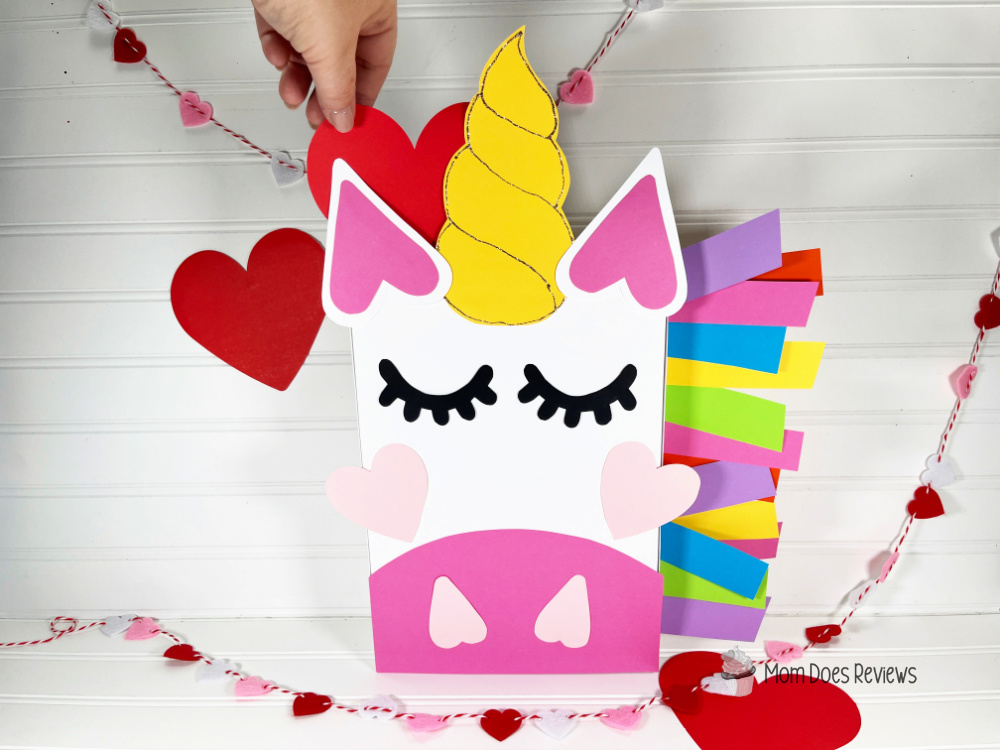
- Glue the muzzle to the bottom edge of the box and the horn to the top center. Attach the ears to either side of the horn (overlapping if necessary), cheeks just above the muzzle, and the closed eyes just above the cheeks. Use the photo for accurate placement.
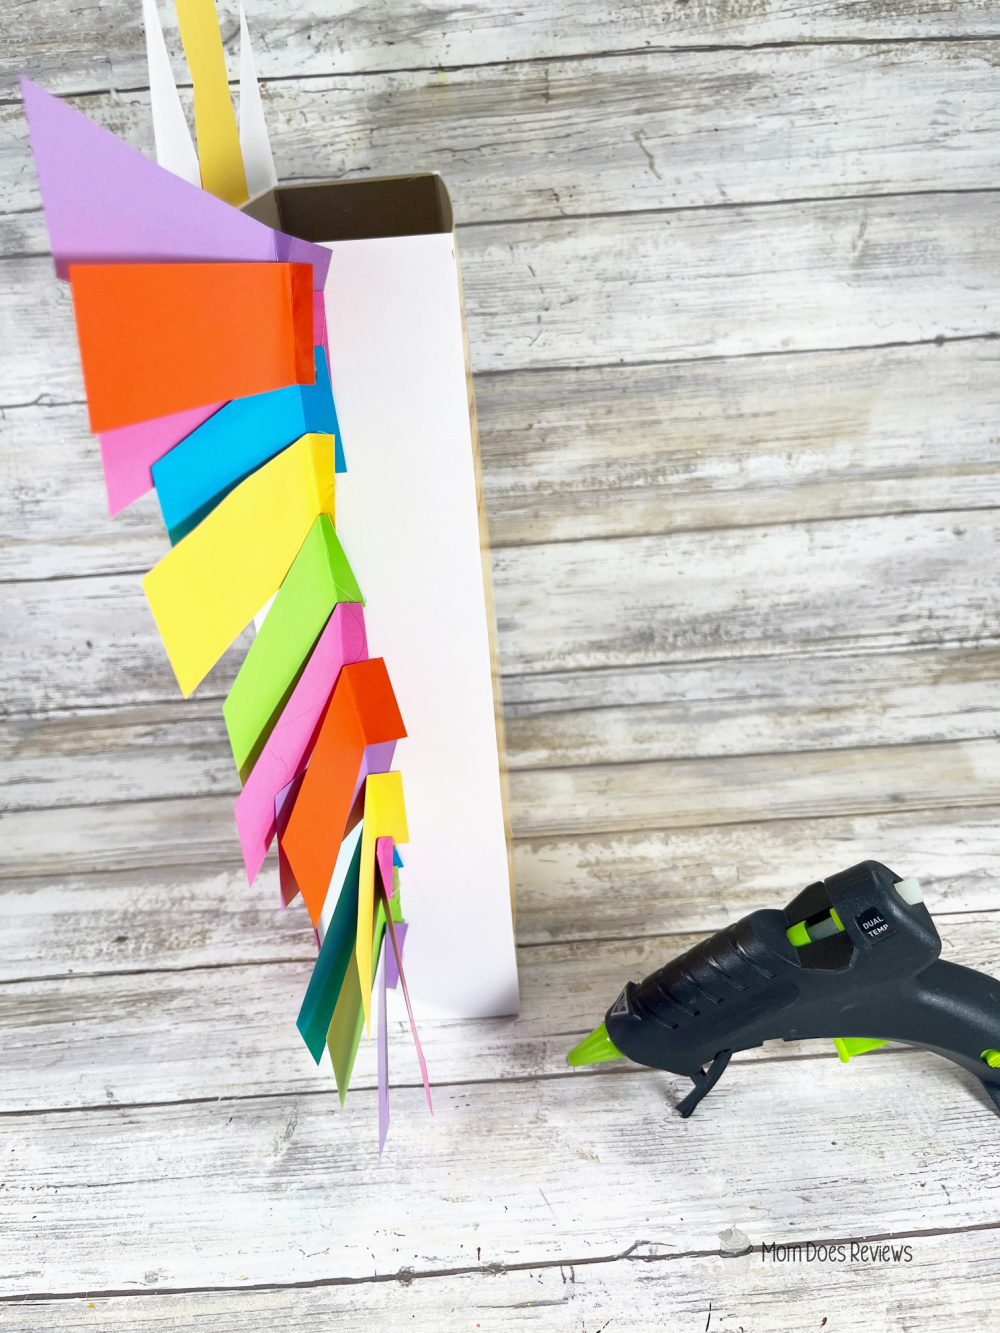
- Starting with a lavender strip at the top, fold over a one-half inch section and attach to the side of the box with a glue gun and glue sticks. Continue to fold and glue the additional rainbow colored sections of the unicorn’s mane to the side of the box until complete. Trim any long sections with scissors.
- Outline the unicorn’s horn with gold glitter glue, and then set it aside and allow it to dry.
- To finish, add your child’s name to the mailbox using letter stickers or a marker before taking it into the classroom.


Print the Tutorial:

Unicorn Valentine Mailbox Tutorial
Using simple supplies from your craft stash and a recycled cereal box, create this quick and easy Unicorn Valentine Mailbox with the kiddos in just 30 minutes.
Materials
- Cereal Box, 12 oz. size - Recycled
- Gold Glitter Glue – Dollar Store
- Colored Cardstock – Black, White, Light Pink, Medium Pink, Orange, Yellow, Bright Green, Blue, Lavender
Tools
- Glue Gun and Glue Sticks – Dollar Store
- Scissors
- Pencil
- Ruler
- PATTERN
Instructions
STEP ONE
Gather all supplies. Using scissors, remove the flaps from the four sides of the cardboard cereal box.
STEP TWO
The height of the 12 oz. box matches up perfectly with 8.5” by 11” cardstock. Measure and cut two rectangles 2.75” wide by 11” tall from a piece of white cardstock, then cut out with scissors. Fit a second piece of white cardstock across the front of the box and carefully fold the right side and left side, then firmly crease the cardstock.
TIP: You can also use felt, craft foam, or construction paper to complete this project.
STEP THREE
Attach the folded piece of white cardstock to the front of the box with a glue gun and glue sticks, then secure the folded sections to the sides of the box. Glue the two rectangles of white cardstock to the right and left sides of the box.
TIP: You can use liquid craft glue for this project, but you will have to wait for it to dry.
STEP FOUR
Download, print, and cut out the unicorn patterns. Trace the muzzle once and inner ears twice onto medium pink cardstock, the horn once onto yellow cardstock, the outer ears twice onto white cardstock, the closed eyes twice onto black cardstock, and the cheeks twice and the nostrils twice onto light pink cardstock with a pencil.
STEP FIVE
Cut out all the traced patterns with scissors, cutting inside the lines to create a clean finished project.
STEP SIX
Using scissors, cut two rectangles approximately 1” wide by 5”-6” long from medium pink, orange, yellow, bright green, blue, and lavender cardstock for the unicorn mane.
STEP SEVEN
Attach the inner ears to the outer ears, and the nostrils to the muzzle with a glue gun and glue sticks.
STEP EIGHT
Glue the muzzle to the bottom edge of the box and the horn to the top center. Attach the ears to either side of the horn (overlapping if necessary), cheeks just above the muzzle, and the closed eyes just above the cheeks. Use the photo for accurate placement.
STEP NINE
Starting with a lavender strip at the top, fold over a one-half inch section and attach to the side of the box with a glue gun and glue sticks. Continue to fold and glue the additional rainbow colored sections of the unicorn’s mane to the side of the box, until complete. Trim any long sections with scissors.
STEP TEN
Outline the unicorn’s horn with gold glitter glue, and then set aside and allow to dry. To finish, add your child’s name to the mailbox using letter stickers or a marker before taking it into the classroom.
Pin it for Later!
How are you?
nice. bro I really like your writing thanks https://s.bgn.go.id/menus/
I like the efforts you have put in this, regards for all the great content.