
🦌 Make Your Own Reindeer! Easy Dollar Store Paper Plate Christmas Craft for Kids
If you’re looking for a fun and festive craft to get everyone in the holiday spirit, this Paper Plate Reindeer Craft is the perfect pick! 🎨✨ It’s simple, budget-friendly, and absolutely adorable — plus, kids will love turning an ordinary paper plate into their very own Rudolph (red nose and all!). Whether you’re crafting at home, in the classroom, or during a Christmas party, this little reindeer is sure to bring big smiles.

One of my favorite things about this craft is how easy it is to personalize. Kids can make their reindeer silly, sparkly, or classic — there’s no wrong way to decorate! Add some googly eyes, a shiny pom-pom nose, and a little creativity, and suddenly you’ve got a herd of reindeer ready to guide Santa’s sleigh. 🎅🖍️ It’s a wonderful way to spend some cozy time together during the holidays while sneaking in a little fine motor fun for the kiddos.
So grab those paper plates, glue, and markers — and let’s get crafting! This Paper Plate Reindeer Craft, made from Dollar Store materials is quick to make, fun for all ages, and the perfect way to sprinkle some homemade holiday cheer into your day. ❤️🎄
More Fun Reindeer Christmas Crafts:
All kids love doing fun Christmas crafts, and boy, do we have a fun one for you today! These adorable DIY Reindeer Gift Bags are the perfect snowy afternoon or classroom craft! This fun craft requires very few materials and can be completed in one sitting, making it the perfect Christmas craft for kids!
The kids will squeal in delight at this fun Toilet Paper Roll Reindeer Craft! They can enjoy creating these fun reindeer while they are anxiously awaiting Santa. This fun craft requires only a few basic supplies and is easy to do by printing the template and following the step-by-step instructions.
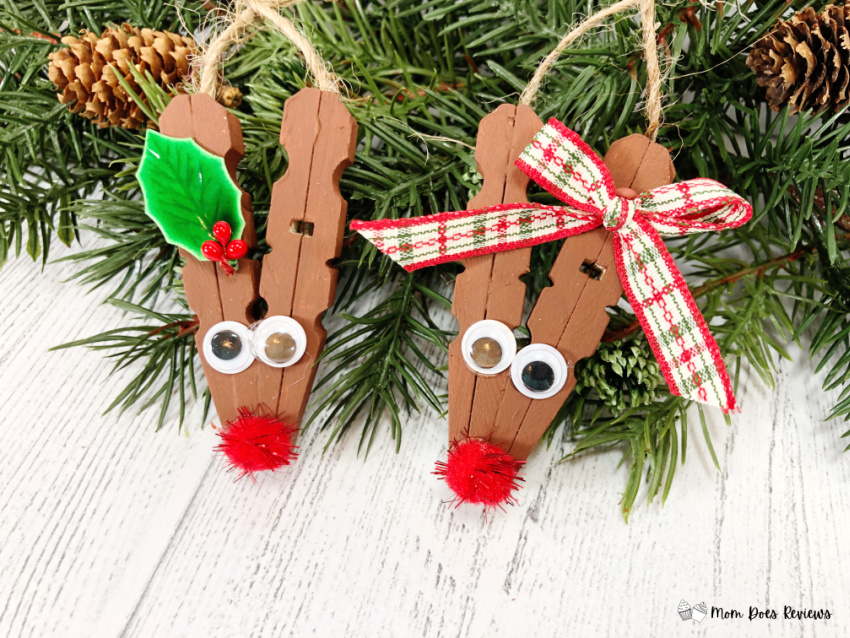
This Dollar Store Clothespin Reindeer Ornament Craft is so adorable AND easy to do! By using a few simple supplies from the Dollar Store, you can create these quick and easy Reindeer couple ornaments in just about 30 minutes.
With Christmas right around the corner and Rudolf on their minds, the kids will have fun making this easy Reindeer Corner Bookmark craft. It is a great craft for a snowy afternoon or for a classroom activity. This easy craft has easy step-by-step instructions that are super easy to follow and turns out so darn cute!
Materials:

- Paper Plate – Dollar Store
- Wiggle Eyes – Dollar Store
- Pom Pom, Tinsel – Dollar Store
- Craft Paint – Brown, Pink
- Cardstock – Tan, Brown
- Glue Gun and Glue Sticks (Amazon or Dollar Store)
- Sponge Dabber – Dollar Store
- Paintbrush
- Scissors
- Pencil
- Permanent Marker, Black
- PATTERNS Paper Plate Reindeer

Instructions:
- Gather all supplies. Basecoat the inside of the paper plate with brown acrylic craft paint. Set aside to dry and apply a second coat, if necessary.

- Download and print the Reindeer patterns, then cut out with scissors. Trace the muzzle and inner ears onto tan cardstock, and trace the antlers and outer ears onto brown cardstock. You could also use colored craft foam or craft felt for this project.
- Cut out the patterns with scissors making sure to cut inside the traced lines for a clean, finished project.
- Attach two wiggle eyes to the reindeer’s face with a glue gun and glue sticks. Glue the muzzle to the bottom half of the paper plate. TIP: You can use liquid craft glue for this project, but you will have to wait for it to dry.
- Create cheeks by dipping a sponge dabber into pink acrylic craft paint and stamping on either side of the muzzle.
- Attach the antlers to the back of the paper plate with a glue gun and glue sticks. Glue the inner ears to the outer ears, then secure to the back of the reindeer’s head just under the antlers.
- Attach the red tinsel pom pom nose to the top center of the muzzle with a glue gun and glue sticks.
- To finish, draw a smile from cheek to cheek with a black marker.
- Once your Paper Plate Reindeer Craft is complete, the fun doesn’t have to stop there! Hang your reindeer on the wall or fridge to show off your child’s creativity, or turn it into a festive holiday decoration by adding a string to make a cute ornament or door hanger. 🎅✨ You can even use them to create a “reindeer herd” display along a mantle or classroom bulletin board — it’s a fun, personal way to spread a little extra Christmas cheer! ❤️


Print the Tutorial:

Paper Plate Reindeer Craft
A simple paper plate from the Dollar Store transforms into an adorable Reindeer craft for kids! This is a fun activity to keep the kiddos busy with coloring, counting and motor skills. Make this super cute paper plate Reindeer kids craft in just about 30 minutes!
Materials
- Paper Plate – Dollar Store
- Wiggle Eyes – Dollar Store
- Pom Pom, Tinsel – Dollar Store
- Craft Paint – Brown, Pink
- Cardstock – Tan, Brown
- Pattern
Tools
- Glue Gun and Glue Sticks
- Sponge Dabber – Dollar Store
- Paintbrush
- Scissors
- Pencil
- Permanent Marker, Black
Instructions
STEP ONE
Gather all supplies. Basecoat the inside of the paper plate with brown acrylic craft paint. Set aside to dry and apply a second coat, if necessary.
STEP TWO
Download and print the Reindeer patterns, then cut them out with scissors. Trace the muzzle and inner ears onto tan cardstock, and trace the antlers and outer ears onto brown cardstock. You could also use colored craft foam or craft felt for this project.
STEP THREE
Cut out the patterns with scissors, making sure to cut inside the traced lines for a clean, finished project.
STEP FOUR
Attach two wiggle eyes to the reindeer’s face with a glue gun and glue sticks. Glue the muzzle to the bottom half of the paper plate. TIP: You can use liquid craft glue for this project, but you will have to wait for it to dry.
STEP FIVE
Create cheeks by dipping a sponge dabber into pink acrylic craft paint and stamping on either side of the muzzle.
STEP SIX
Attach the antlers to the back of the paper plate with a glue gun and glue sticks. Glue the inner ears to the outer ears, then secure them to the back of the reindeer’s head just under the antlers.
STEP SEVEN
Attach the red tinsel pom pom nose to the top center of the muzzle with a glue gun and glue sticks.
STEP EIGHT
To finish, draw a smile from cheek to cheek with a black marker.
Pin it for Later!
