
Crawling into Fun: Craft a Paper Plate Caterpillar!
Get ready to crawl into a world of crafting fun because we have the perfect project to get those creative juices flowing! Our delightful Dollar Store Paper Plate Caterpillar Craft is here to prove that a simple paper plate can be transformed into the cutest, most charming little caterpillar. This isn’t just a craft; it’s a wonderfully hands-on activity that’s guaranteed to bring smiles and giggles.

This project is fantastic because it’s a great way to keep the kiddos busy with a variety of skills. As they color, count the body segments, and work with scissors and glue, they’ll be developing important coloring, counting, and motor skills in a playful and engaging way. It’s a crafting adventure that’s both educational and incredibly enjoyable for little hands and minds!
Best of all, you can make this super cute paper plate caterpillar in just about 30 minutes, making it an ideal choice for a spontaneous afternoon activity, a classroom project, or a quick-and-easy craft for a birthday party. So, grab a paper plate from the Dollar Store, gather your supplies, and get ready to create your very own colorful and cuddly caterpillar!
More Fun Paper Plate Crafts:
Looking for fun and easy crafts for the kids? Look no further than this adorable UFO Paper Plate Craft! The kids will squeal in delight over creating their very own UFO, complete with a little alien!
The kiddos will squeal in delight over this super adorable ‘Sun Rising’ Paper Plate Craft! You really can’t get any cuter than this one and the colors are fun and bright just like the kids like.
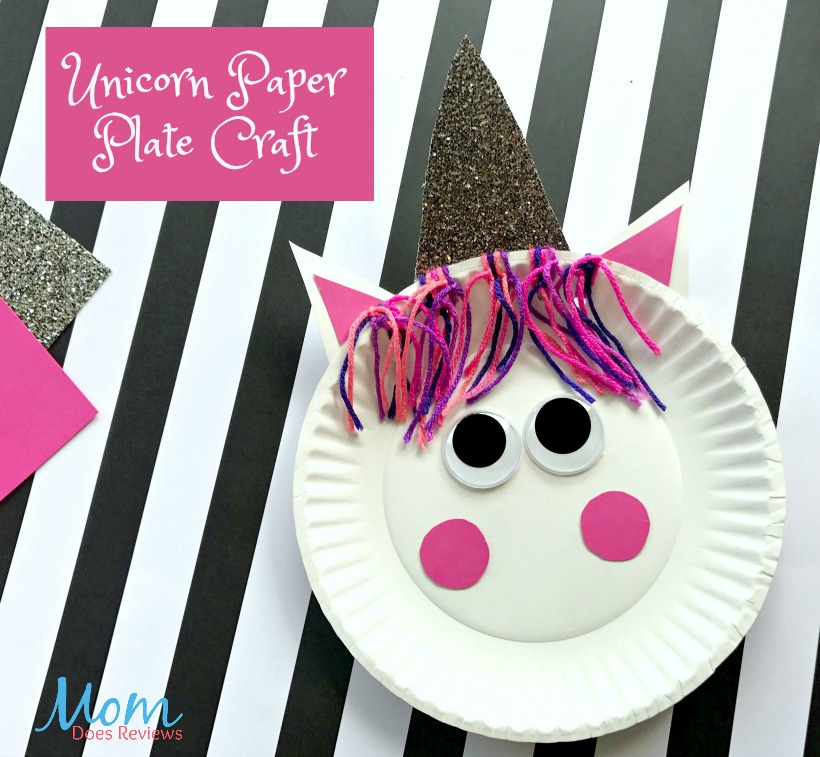
In need of a fun and magical craft to spark some creativity in your kids? If they love all things unicorns, get ready for a crafting adventure they won’t forget! This super cute Unicorn Paper Plate Craft is the perfect way to spend a whimsical afternoon, transforming simple supplies into a mythical friend that’s full of sparkle and charm.
Baby Yoda Paper Plate Craft: If your kids love Star Wars and crafts, they will love this easy Baby Yoda Paper Plate Craft. You only need a few supplies and a few minutes and you’ll have your very own Baby Yoda! I know he is one of my favorite characters and this craft is one of my new favorites!
Calling all space explorers and budding crafters! Get ready to blast off into a universe of creativity with our Paper Plate UFO Craft! This easy and engaging project is perfect for kids of all ages, and the best part? It uses materials you probably already have lying around the house!
Materials:

- Paper Plate – Dollar Store
- Wiggle Eyes – Dollar Store
- Chenille Stem, Black and Purple – Dollar Store
- Pom Poms, Yellow – Dollar Store
- Cardstock, Bright Green
- Craft Paint – Red, Orange, Yellow, Blue, Purple, Pink
- Glue Gun and Glue Sticks
- Paintbrush
- Scissors
- Ruler
- Permanent Marker
- Sponge Dabber
- PATTERN Paper Plate Caterpillar

Instructions:
- Gather all supplies. Fold the paper plate in half and crease firmly. Basecoat half of the inside of the paper plate in wedges of red, purple, yellow, blue, and orange acrylic craft paint. Set aside to dry and apply a second coat, if necessary.

- Cut the paper plate in half with scissors, then cut along the curve to remove the center. This creates the caterpillar body shape.
- Download and print the Caterpillar Pattern, then cut out with scissors. Trace the head once onto the bright green cardstock. You could also use colored craft foam or craft felt for this project.
- Cut out the caterpillar head pattern with scissors, making sure to cut inside the traced lines for a clean, finished project.
- Attach two wiggle eyes to the caterpillar’s face with a glue gun and glue sticks. Create cheeks by dipping a sponge dabber in pink acrylic craft paint and stamping on either side of the caterpillar’s face. TIP: You can use liquid craft glue for this project, but you will have to wait for it to dry.
- Cut a purple chenille stem in half with scissors. Bend in half, then attach a yellow pom pom to each end to create antennae.
- Cut two black chenille stems into one-inch pieces with scissors. These will become the caterpillar’s legs.
- Flip the caterpillar over on your work surface and attach the chenille stem legs along the bottom edge with a glue gun and glue sticks.
- Attach the antennae to the head and the head to the body with a glue gun and glue sticks.
- To finish, draw a smile with a black marker to create the caterpillar’s mouth.


Print the Tutorial:

Dollar Store Paper Plate Caterpillar Craft
A simple paper plate from the Dollar Store transforms into the cutest caterpillar craft for kids! This is a fun activity to keep the kiddos busy with coloring, counting and motor skills. Make this super cute paper plate caterpillar kids craft in just about 30 minutes!
Materials
- Paper Plate – Dollar Store
- Wiggle Eyes – Dollar Store
- Chenille Stem, Black and Purple – Dollar Store
- Pom Poms, Yellow – Dollar Store
- Cardstock, Bright Green
- Craft Paint – Red, Orange, Yellow, Blue, Purple, Pink
- PATTERN Paper Plate Caterpillar
Tools
- Glue Gun and Glue Sticks – Dollar Store
- Paintbrush
- Scissors
- Ruler
- Permanent Marker
- Sponge Dabber
Instructions
STEP ONE
Gather all supplies. Fold the paper plate in half and crease firmly. Basecoat half of the inside of the paper plate in wedges of red, purple, yellow, blue, and orange acrylic craft paint. Set aside to dry and apply a second coat, if necessary.
STEP TWO
Cut the paper plate in half with scissors, then cut along the curve to remove the center. This creates the caterpillar body shape.
STEP THREE
Download and print the Caterpillar Pattern, then cut out with scissors. Trace the head once onto the bright green cardstock. You could also use colored craft foam or craft felt for this project.
STEP FOUR
Cut out the caterpillar head pattern with scissors making sure to cut inside the traced lines for a clean, finished project.
STEP FIVE
Attach two wiggle eyes to the caterpillar’s face with a glue gun and glue sticks. Create cheeks by dipping a sponge dabber in pink acrylic craft paint and stamping on either side of the caterpillar’s face.
TIP: You can use liquid craft glue for this project, but you will have to wait for it to dry.
STEP SIX
Cut a purple chenille stem in half with scissors. Bend in half, then attach a yellow pom pom to each end to create antennae.
STEP SEVEN
Cut two black chenille stems into one-inch pieces with scissors. These will become the caterpillar’s legs.
STEP EIGHT
Flip the caterpillar over on your work surface and attach the chenille stem legs along the bottom edge with a glue gun and glue sticks.
STEP NINE
Attach the antennae to the head and the head to the body with a glue gun and glue sticks.
STEP TEN
To finish, draw a smile with a black marker to create the caterpillar’s mouth.
Pin it for Later!
