
This fall I had an idea to make cinnamon scented pumpkins to be displayed on my kitchen island. Shortly after starting my project I realized that you may love them as much as I do — so, I started taking pictures for you.
I hope you enjoy my cinnamon scented pumpkins this Thanksgiving ~ Victoria

Use these cinnamon scented pumpkins stacked together inside a cylinder on your Thanksgiving table, on a skewer tucked between flowers in your floral arrangement, stacked together on plates (or small bowls) throughout your home. The uses for these little pumpkins really are endless!
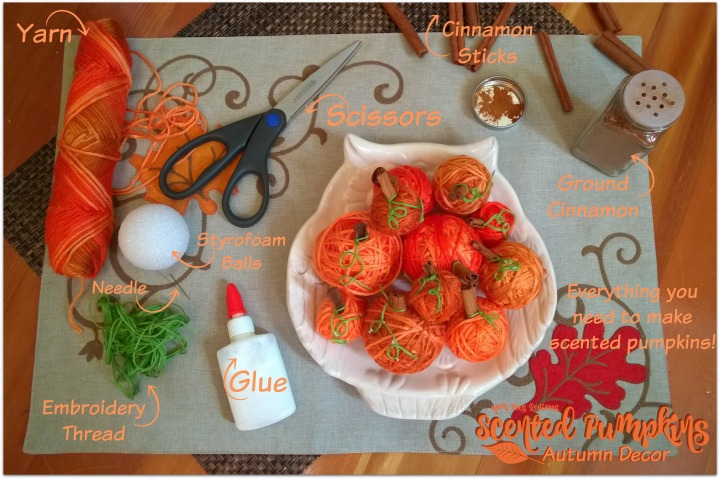
Everything you need to make scented pumpkins at home:
I purchased everything I needed to make my scented pumpkins for less than $10. If you have many of these items already on hand, your crafting costs will be much less than mine.
Supply List:
- Orange Yarn
- Styrofoam Balls (multi-size/mixed package)
- Cinnamon sticks
- Ground Cinnamon
- School glue
- Embroidery thread
- Sewing needle
- Scissors
For the orange yarn I selected a multi-colored variety. I love these because they can provide you with several different shades to your pumpkins without the expense of purchasing all of those varieties of orange tones separately. Amazon has two types of multi-colored orange yarn that I like. The first is similar to the one shown in the photos in this post, see it HERE, and the second is a very bulky and elegant with true autumn shades — I will likely use THIS roving yarn next year.
In regards to the Styrofoam balls I selected, I opted for multiple sizes in one package for a little variety when displaying them. I strongly suggest you do the same as it will give your arrangement/display depth and be more visually appealing to your guests.
Let’s get started!
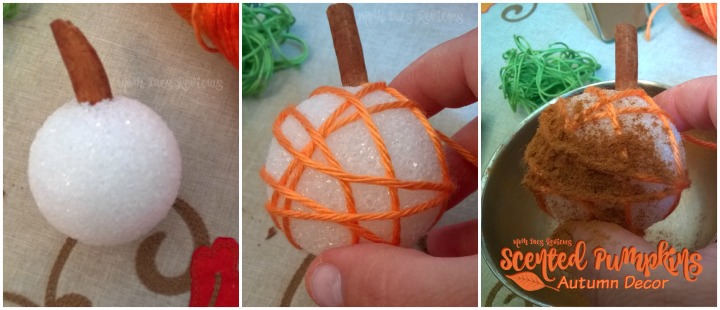
Making your scented pumpkins is very easy. First, break a cinnamon stick in half. If your stick doesn’t break immediately, set it aside and grab another one. There is no need to use a saw or other tool when there will be plenty of cinnamon sticks in your package that will break easily.
Moving on, take your cinnamon stick and pierce it into your Styrofoam ball. Keep in mind that your ball is going to be thicker than it is when it is bare so your cinnamon stick should stick out and may look a little less proportioned than your final result.
Remove the cinnamon stick and place the end of your yarn into the hole. Return the cinnamon stick and begin winding the yarn around the Styrofoam ball. After a few passes, sprinkle ground cinnamon all over your ball (the yarn will give the cinnamon something to stick to, more-so than the bare Styrofoam.) See the photo above if you need a visual of the first few steps.
Continue winding yarn in several different directions until all of the Styrofoam is covered and you are pleased with the tone/color. Return the yarn to the top of the ball, keeping it tight. Cut yarn at the end of your winding, a few centimeters from your fingers. Remove the cinnamon stem (carefully), add a little squeeze of glue into the hole, gently place your final end of yarn into the hole, and return the cinnamon stick. The yarn should remain TIGHT throughout winding and during the final tucking into the stem. If it comes lose during the final stage, remove the stem and repair, and repeat the final steps.
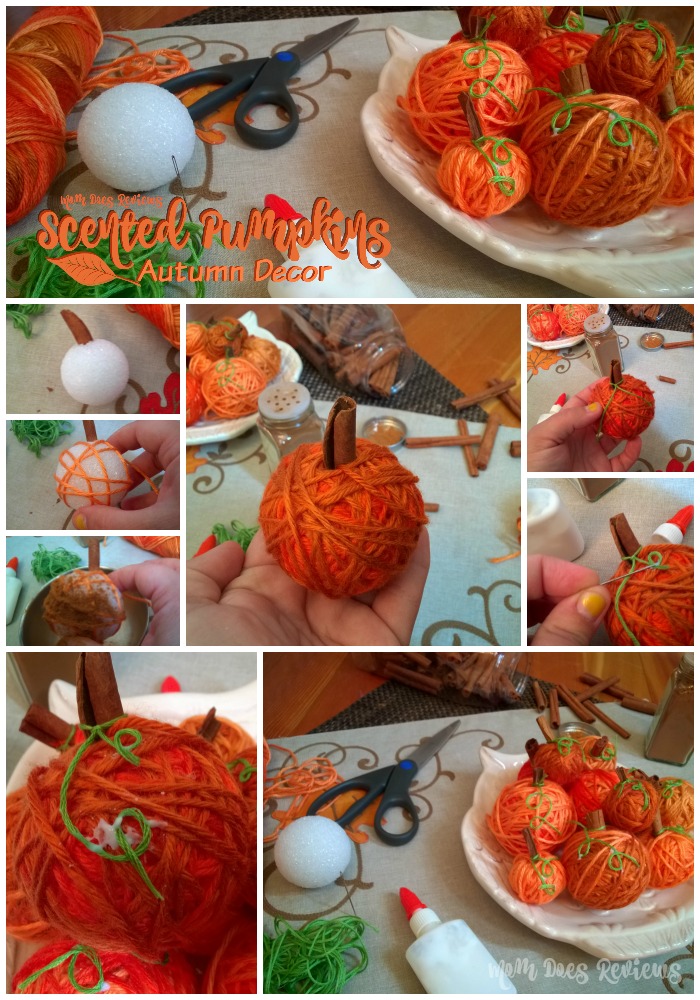
While the pumpkins are adorable as they are, the added green embroidery floss really makes them look like pumpkins. I tied a small piece of thread around the stems and used my needle dipped in glue to add a little whimsy. The green embroidery loops make the pumpkins look amazing!
Allow your pumpkins to dry someplace where they won’t be disturbed. The school glue will dry clear and EVERYONE will love how amazing they smell in your home.