Homemade Decorations: Get Crafty with the Kids this Christmas
Guest post by Kat Cole
Christmas is just around the corner and this means several things. Firstly, money is bound to get tighter in the lead up to the big day and secondly; the decorations will soon be due to go up. The kids will no doubt also be constantly under your feet once the school term ends for the Christmas holidays and some may even misbehave as the wait for their new toys becomes too much.
Making Christmas decorations at home can help to solve these issues however, for this is often cheaper than buying your decorations at the store and the children will be kept occupied (and we all know that it is bored children who are most naughty!) Here then, are three Christmas crafts that can see pennies and punishments saved during December…
Christmas Paper Chains
What you will need:
- Colored tissue/craft paper (green and red is particularly festive!);
- Children’s scissors;
- PVA (Elmers)Glue and
- Thumb Tacks (for affixing chains to ceilings/walls).
Paper chains are probably one the easiest Christmas decorations that a person can make at home and this means making them is a great activity for younger children. To create standard paper chains, strips of uniform size should be cut from at least two different colors of paper (although such strips can also be bought pre-prepared from craft shops). Dab glue onto one end of a strip and press into a loop and then simply feed the next strip through the middle of this loop and repeat the process to create another loop. When you see the following picture, these instructions become clearer:
Image accreditation: joannapoe, Flickr
Continue to feed strips through and glue them into loops until your chain is long enough to reach whichever area/s of your house you wish to hang the chain from upon completion.
Children who find standard paper chains too easy – and therefore boring – might be more stimulated by the creation of paper lotus chains. Use tissue/craft paper again to cut out leaf and flower shapes in contrasting colors. Visit www.howstuffworks.com for more information.
For every one leaf shape cut out, your child will need two that are flower shaped.
When all of the shapes are cut out, put a dot of PVA in the center of a leaf and press the middle of a flower on to it. A tiny blob of glue should then be pla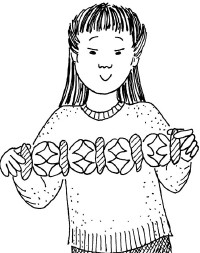 ced into the point of each petal of another flower and this should then be lined up and then pressed onto the other flower that is already glued to the first leaf. Again, repeat this process until your chain is of a satisfactory length. The chain will eventually look something like this;
Homemade Christmas Baubles
What you will need:
- Polystyrene craft balls/ ping pong balls;
- Glitter;
- Small Christmas themed stickers;
- Paint/glue brush;

- PVA glue;
- Reel of cotton;
- Flat-head drawing pins and
- Sheets of newspaper

Image accreditation: productwiki.co.uk
How would you like a selection of baubles as beautiful as those in the picture above for a very low price? If you (or a friend or relative) happens to have a few unwanted ping pong balls lying around or a craft shop close by that sells polystyrene balls for art purposes then this is easily achieved.
Children simply need to brush a thin coat of PVA over your chosen balls and then roll them in glitter and leave to dry. If desired, additional decoration can be added to these sparkly balls using Xmas-themed stickers once the glue has dried. Once the baubles are ready to be hung on the branches of the family Christmas tree, flat-head drawing pins can be used to secure a loop of cotton to each. Children might need help with this stage should hard-to-pierce ping pong balls be selected for bauble making.
If the bauble making is performed on top of a double sheet of newspaper then this will see no glitter wasted unnecessarily. The fold of the paper can be used to carefully gather and pour any debris back into the pot (this will stop your carpet looking as if magical fairies have sneezed all over it too!)
Popcorn Christmas Tinsel
 What you will need:
- Popcorn;
- Microwave;
- Silver paint (optional);
- PVA glue (optional);
- Glitter (also optional);
- Needle (be careful!) and
- Cotton thread.
Image accreditation: onsalechina.com
Creating popcorn tinsel really is very simple After popping a bowl of popcorn kernels in the microwave, have your kids paint them silver (I would recommend spray paint for this task but I understand that some parents do not want their child to be exposed to chemicals contained in some sprays – poster paint will suffice if this is the case).
Once the kernels are dry, they can be lightly dabbed with PVA glue and sprinkled with glitter though this is an optional extra. Some people even like to keep their ‘corn completely undecorated so that the tinsel is edible! Whatever your preference, once your kennels are decorated use a needle to pierce the middle of each and thread them onto some cotton.
A blunt – and therefore safer – needle should be perfectly adequate for the job but should a need to use a sharper needle arise, younger children must be supervised by adults. Make sure your children have several thimbles to hand to stop finger pricks! Once your popcorn tinsel is ready it can be attractively wrapped around the branches of your Christmas tree or hung neatly from the mantelpiece.
The author of this guest post – Kat Cole – is the mother of five children which have so much energy that they could ascend 1,000 climbing frames in a row! Making homemade decorations is just one part of the play system she has designed to keep her little terrors occupied throughout the Christmas period.